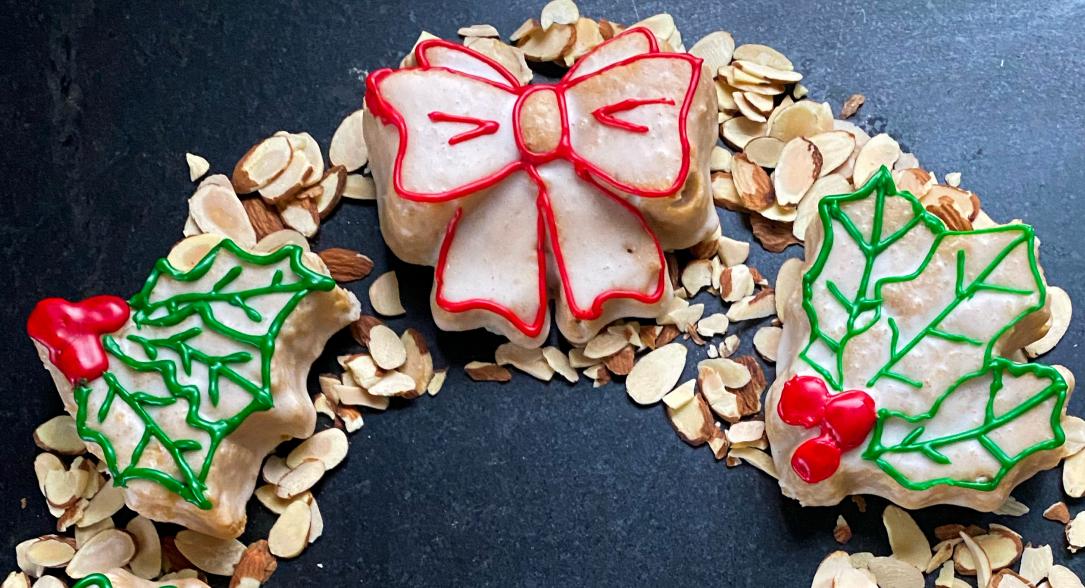
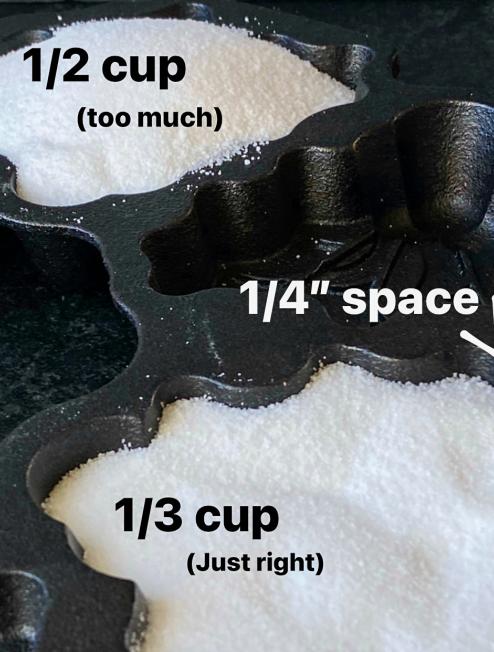
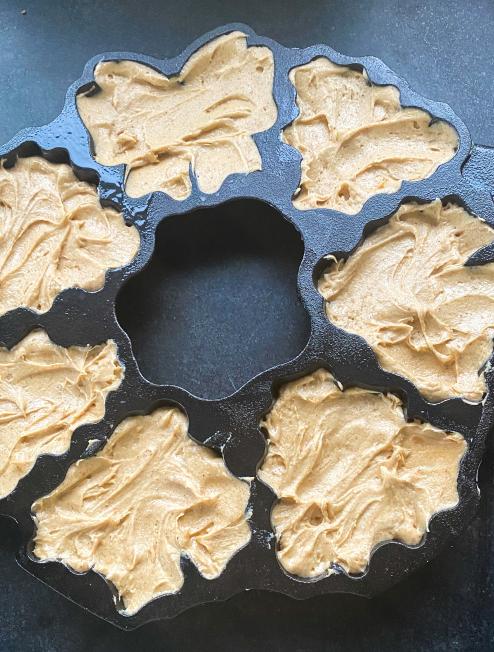
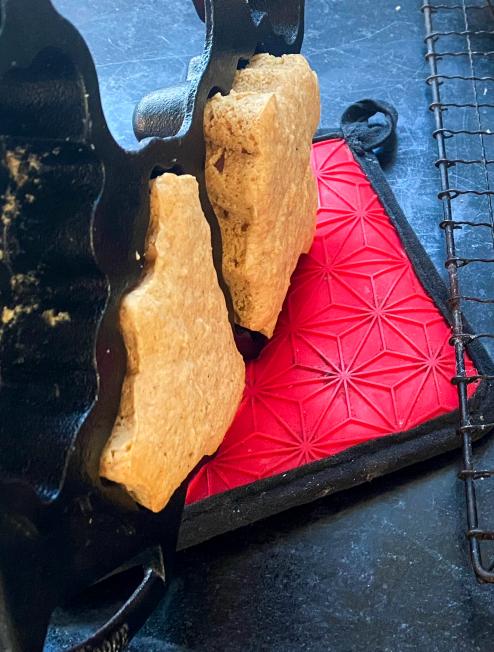
Tips & Tricks How to Use the Holiday Wreath Pan By: Susan Reid / December 10, 2020 Individual desserts are all the rage, and the new Lodge Holiday Wreath Pan presents a unique way to make that happen. But how do you work with it? Here are some tips, from start to finish, to bake your best and most beautiful holiday desserts. E-mail this page Share on Facebook Share on Pinterest Share on Twitter Print this page Choose the right recipe With patterned pans in general, it’s important to choose a recipe that’s fairly closely grained. Any recipe that slices well and is sturdy enough to stack as a layer cake should work. Pound cakes or recipes written for Bundt pans are a good place to start. Make it right-sized The wreath pan takes 1/3 cup of batter to fill each well about 3/4 full. The idea is to put enough batter into each well to create all the details in the pattern, without having too high a dome on each cake when it bakes. Too much batter would overflow the wells, causing them to bake together and risking it running over the edge of the pan and onto your oven floor. Most standard layer-cake recipes create about 6 cups of batter. This amount is enough for two 9-inch layers, three 8-inch layers, 24 cupcakes, or one 9 x 5 inch loaf cake. The wreath pan needs just over 2 cups of batter to fill all of its wells without overflowing. In general, if you have a favorite cake recipe you’d like to try, make a half batch and you’ll end up with enough for the wreath pan’s cakes and perhaps a cupcake or two on the side with the leftover batter. Or, if you make the full recipe, fill the wreath pan and bake a layer or two to go with it. Pan prep and tips First, grease the wells of your wreath pan. You can use pan spray, oil, or shortening. Don’t use butter; the water in it makes it more likely that the cakes will stick. If you use a pan spray, use a pastry brush to even out the film of oil; this will prevent bubbles from forming on what will become the tops of the cakes. Next, don’t overfill the wells of the pan. There should be ¼-inch of space left in each well; this will fill in as the cakes rise. Once the batter is in the wells, tease it to the edges with a small offset spatula or the tip of a table knife (see photo). One last hint: Once you’ve portioned the batter, pick up the pan and tap it on the counter 3 or 4 times before baking it. This will ensure the batter is nicely settled into all the voids in the pattern. Sometimes giving the filled pan a time-out in the refrigerator for 30-40 minutes will enhance the final look of patterned cakes; this rest allows the leavening to disperse just enough to allow the cakes’ surfaces to be more uniform. Getting the cakes out in one piece Timing is key here. It’s important that the cake is cooled enough not to be too fragile, but still warm enough to be flexible so it doesn’t crack or tear as you take it out. After you take the cake out of the oven, put it on a rack and set a timer for 15 minutes. As the cakes cool, it’s ok to gently pull them back from the edges of the wells. Once the timer goes off, tilt the pan or put it up on its edge to loosen the cakes and gently remove them. A tapered, small offset spatula can be helpful with this. If you don’t have one, a fork can help you ease the cakes out enough so you can handle them. The Finishing Touch Patterned cakes are best enhanced with simple finishes. This can be as basic as a sugar syrup or a dusting of powdered sugar. Frosting should be thin enough to be sheer, so that the pattern from the pan shows through. Glazing the cakes helps to keep them fresh and moist. For the Holiday Wreath Pan, a bit of colored frosting can trace the pattern from the pan to enhance the design. For the final wow, choose a large platter and place the cakes on it in the same orientation as they came of the pan. Tinted shredded coconut or toasted sliced almonds can be used as a background to enhance the final presentation. Vanilla Wreath Cake This cake makes the perfect holiday centerpiece. Chocolate Cake With Ganache A chocolate cake that ticks all the boxes: incredibly moist, light and fudgy, intensely chocolate-y, just the right amount of sweet. Holiday Almond Pound Cake Celebrate the holidays with a centerpiece that's as beautiful as it is delicious. Rum Cake The boozy flavor of this cake is perfectly offset by the crunch of the pecans. Frosted Pound Cake This classic frosted pound cake has just a hint of lemon to keep the flavor fresh and light. Contributed By: Susan Reid Chef Susan Reid is the food editor of Sift Magazine, a baking publication by King Arthur Baking Company. In her spare time, Susan shares some of her recipes on her blog, The Well Plated Life. Get $10 off any $50+ order!* While you're shopping, become a Pan Fan today and sign up for our newsletter! *Coupon code will be sent to your email after you sign up for our newsletter! New sign ups only. Sign Up By submitting your information, you are agreeing to Lodge Cast Iron’s Terms of Use and Privacy Policy. Please try again.
Tips & Tricks How to Use the Holiday Wreath Pan By: Susan Reid / December 10, 2020 Individual desserts are all the rage, and the new Lodge Holiday Wreath Pan presents a unique way to make that happen. But how do you work with it? Here are some tips, from start to finish, to bake your best and most beautiful holiday desserts. E-mail this page Share on Facebook Share on Pinterest Share on Twitter Print this page Choose the right recipe With patterned pans in general, it’s important to choose a recipe that’s fairly closely grained. Any recipe that slices well and is sturdy enough to stack as a layer cake should work. Pound cakes or recipes written for Bundt pans are a good place to start. Make it right-sized The wreath pan takes 1/3 cup of batter to fill each well about 3/4 full. The idea is to put enough batter into each well to create all the details in the pattern, without having too high a dome on each cake when it bakes. Too much batter would overflow the wells, causing them to bake together and risking it running over the edge of the pan and onto your oven floor. Most standard layer-cake recipes create about 6 cups of batter. This amount is enough for two 9-inch layers, three 8-inch layers, 24 cupcakes, or one 9 x 5 inch loaf cake. The wreath pan needs just over 2 cups of batter to fill all of its wells without overflowing. In general, if you have a favorite cake recipe you’d like to try, make a half batch and you’ll end up with enough for the wreath pan’s cakes and perhaps a cupcake or two on the side with the leftover batter. Or, if you make the full recipe, fill the wreath pan and bake a layer or two to go with it. Pan prep and tips First, grease the wells of your wreath pan. You can use pan spray, oil, or shortening. Don’t use butter; the water in it makes it more likely that the cakes will stick. If you use a pan spray, use a pastry brush to even out the film of oil; this will prevent bubbles from forming on what will become the tops of the cakes. Next, don’t overfill the wells of the pan. There should be ¼-inch of space left in each well; this will fill in as the cakes rise. Once the batter is in the wells, tease it to the edges with a small offset spatula or the tip of a table knife (see photo). One last hint: Once you’ve portioned the batter, pick up the pan and tap it on the counter 3 or 4 times before baking it. This will ensure the batter is nicely settled into all the voids in the pattern. Sometimes giving the filled pan a time-out in the refrigerator for 30-40 minutes will enhance the final look of patterned cakes; this rest allows the leavening to disperse just enough to allow the cakes’ surfaces to be more uniform. Getting the cakes out in one piece Timing is key here. It’s important that the cake is cooled enough not to be too fragile, but still warm enough to be flexible so it doesn’t crack or tear as you take it out. After you take the cake out of the oven, put it on a rack and set a timer for 15 minutes. As the cakes cool, it’s ok to gently pull them back from the edges of the wells. Once the timer goes off, tilt the pan or put it up on its edge to loosen the cakes and gently remove them. A tapered, small offset spatula can be helpful with this. If you don’t have one, a fork can help you ease the cakes out enough so you can handle them. The Finishing Touch Patterned cakes are best enhanced with simple finishes. This can be as basic as a sugar syrup or a dusting of powdered sugar. Frosting should be thin enough to be sheer, so that the pattern from the pan shows through. Glazing the cakes helps to keep them fresh and moist. For the Holiday Wreath Pan, a bit of colored frosting can trace the pattern from the pan to enhance the design. For the final wow, choose a large platter and place the cakes on it in the same orientation as they came of the pan. Tinted shredded coconut or toasted sliced almonds can be used as a background to enhance the final presentation. Vanilla Wreath Cake This cake makes the perfect holiday centerpiece. Chocolate Cake With Ganache A chocolate cake that ticks all the boxes: incredibly moist, light and fudgy, intensely chocolate-y, just the right amount of sweet. Holiday Almond Pound Cake Celebrate the holidays with a centerpiece that's as beautiful as it is delicious. Rum Cake The boozy flavor of this cake is perfectly offset by the crunch of the pecans. Frosted Pound Cake This classic frosted pound cake has just a hint of lemon to keep the flavor fresh and light. Contributed By: Susan Reid Chef Susan Reid is the food editor of Sift Magazine, a baking publication by King Arthur Baking Company. In her spare time, Susan shares some of her recipes on her blog, The Well Plated Life.